Home Tour: Loft Bedroom

Ok, this is a bittersweet post. Excited to share another Home Tour with you guys but it will be our last from the loft. Yep. We’re moving again! More deets on that later(promise!). But before we say goodbye to the loft lets check out the Bedroom since it had some of my favorite DIYs to date!

Home Tour: Bedroom

Copper Plant Stands: This was the first time I’ve worked with real copper pipes for a DIY and I was instantly hooked! This project comes together so quickly and requires very little supplies. Plus it dresses up even the most basic pots!

Home Tour: Bedroom

MALM Nightstand Hack: I feel like we’ve all had some variation or piece from the MALM collection. Its solid, inexpensive, and super affordable. Unfortunately its also very basic. Hacking these nightstands with hardware and chalk paint completely customized them with minimal effort.

Home Tour: Bedroom

Painted Throw Pillows: Speaking of minimal effort… these throw pillows were more like a coloring book exercise than full on DIY! I loved the design and price but they didnt fit our color scheme as-is. A little rose gold paint and fabric medium changed that real quick!

Home Tour: Bedroom

Rose Gold Lamps: A little rose gold paint was also key to these lamp makeovers. They started out a basic college dorm room lamp from Target. With a coat of rose gold paint and new shades they coordianted perfectly with the nightstand hack!

Home Tour: Bedroom

Painted Fabric Chair: This project was a long time coming! We bought this chair when we lived on the east coast with plans to reupholster. After a bit more research we quickly realized that project was way more work than we actually had time for so it sat as-is for some time. Once we moved into the loft I was ready to find a better solution and its no surprise I decided on paint. After a little research and a few fabric medium tests I found the perfect paint solution! Its been months and this is still my favorite reading spot.

Home Tour: Bedroom

Customized Planters: There are always those last few touches that complete any room. For me this generally revolves around plants(yes Im an aspiring #plantlady!). This post showed a few ways I customized store bought planters.

Home Tour: Bedroom

Home Tour: Bedroom

Gallery Wall: like I mentioned in the original post, I put these in every space we move into. I love the symmetry, repetition, and clean design it brings to our spaces. This hack helps get them up quickly and with minimal effort. Plus I love the subject in this set of prints! 😉

Home Tour: Bedroom

This loft bedroom was one of my favorite spaces. I loved the airy open feel and the gorgeous light we woke up to every morning. It may also be the most DIYs Ive managed within one space! So have you added any DIYs to your master bedroom? Tried any of the above in your own home? You know I’d love to hear all about it in the comments!

Home Tour: Bedroom
Continue Reading

Home Tour: Kitchen

Its been a while since we moved into our loft. For quite some time the kitchen was in a constant shuffle. Its one of the most used spaces and I may(ok, definitely) be particular about how things are situated. My only excuse is that I do 99% of the cooking in our home. Ha! So now that things are just right I thought it was time to share the Kitchen Tour!

Home Tour Kitchen

This post includes affiliate links. For the full disclosure policy click here.

One of the best things we did when we moved in was make this kitchen island. We have shuffled the contents here and there but overall its stayed the same. And we LOVE it. This adds so much extra storage to our kitchen and our most used items are conveniently within reach.

Home Tour Kitchen

Some of the shelves are open for storing larger items and others we’ve found containers for. We’ve used a combination of collapsible bins and magazine organizers for most everything. And lastly, we found the perfect adjustable wine storage! This took some trial and error but when this is built into a square it fits perfectly in the cubes of the expedit shelves.

Home Tour Kitchen

We also attached this magazine rack to the far side for lid storage. I just love these things! I’ve used them for years even before we built this island. They have been discontinued at the stores(Ikea) but you can still grab similar ones on Amazon. Ive attached them to kitchen carts and even the inside of kitchen cabinets. Its honestly the best way I’ve found to keep lids organized so far.

Kitchen Tour

Other easy organizing products Ive found are wood trays and chalkboard labels. The trays I’ve painted to match the rest of the decor in the kitchen. And yes, of course I used chalk paint and wax! So far these have held up really well and the wax finish cleans well with just a wet rag. The labels I found on Amazon and I use them on EVERYthing! I cut them to fit on smaller jars and use the full labels for larger canisters.

Kitchen Tour

The other thing Ive added here and there is plants. I used to have the hardest time keeping ANY plants alive but something about this place is turning that right around! I think the amount of light we get in the loft is playing a big part. It may also be the plants themselves. Ive narrowed it down to a few varieties that are pretty indestructible. Generally speaking, I can keep succulents and philodendrons alive. Lets all cross our fingers that they are still alive after this is published. Ha!

Kitchen Tour

Kitchen Home Tour
Home Tour: Kitchen Edition. Check out the loft kitchen with DIY island for tons of extra storage!

So what organizing products or DIYs are you using in your kitchen? Are plants taking over your countertops too? You know Id love to hear all about it in the comments!

Continue Reading

Modern Painted Antlers

This post includes affiliate links. For the full disclosure policy click here.

Modern Painted Antlers

I grew up in a house of hunters. My husband also grew up in a house of hunters. We both lived with antlers and other taxidermy trophies and it was only a matter of time before they made it into our home as a couple. The only problem I had with this is the style or “look” they imply. See, we arent cabin, lodge, woodsy, etc kind of people within our own space. Its just not us. #nojudgement So a few coats of paint later and we are loving our “new” modern antlers!

Modern Painted Antlers

The set on the left is one Q actually hunted when he was a kid. They are sentimental and I’ve been trying to find a way to integrate them into our space for quite a while. The set on the right is from Target and completely ceramic. They are both ok on their own but neither fit our style or space.

Ive seen a bunch of tutorials and antler makeovers using spray paint but I really wanted to stick to the color pallet we chose for the living room. And finding those exact colors is basically impossible. So I used the Ceramcoat Select from Delta to mix my colors to an exact match. Its the first time I’ve used these satin finishes and I totally loved them!

Modern Painted Antlers

I separated the real antlers from the plaque to make painting easier. I wiped everything down with a damp rag to remove dust and thats it. Im not big on prep work… are you guys picking up on that? Ha!

Being that these would be mounted and nearly never handled I wasn’t too concerned with primers or sealers. I just laid out some newsprint and started slapping on the acrylic!

Modern Painted Antlers

[after 1 coat of acrylic paint]

Modern Painted Antlers

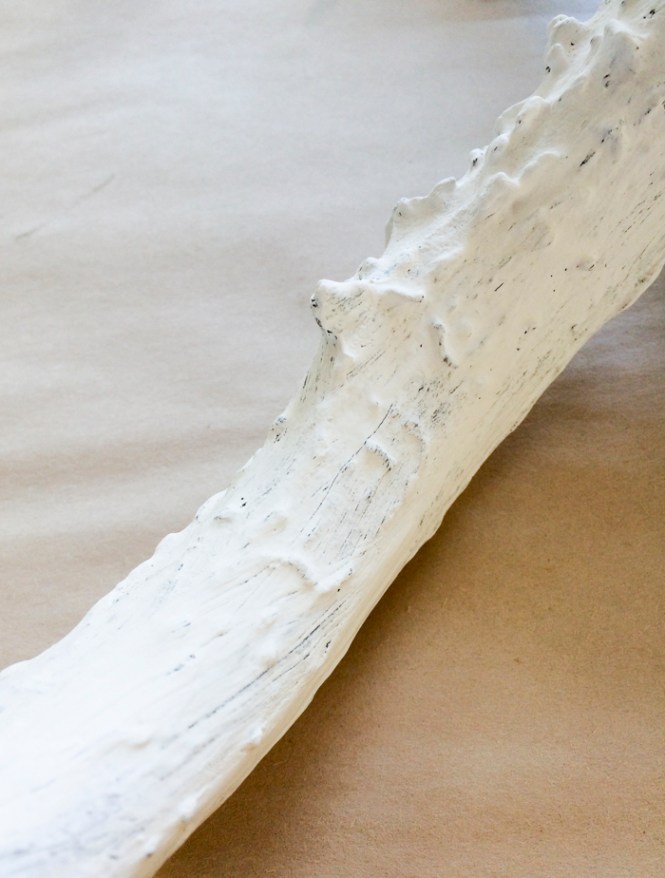
I used bristle brushes to really work the paint into the uneven surface of the antlers. It took 2 solid coats to get full coverage[see above for coverage after 1 coat] and I did a little bit of touch up on the real knobby bits.

Modern Painted Antlers

Painting over the fur was a bit different. It took 3 coats to really cover everything and I used a softer synthetic brush. Also, you need to paint with the grain so this dries “laying down”. The paint will make the fur stiff so you want to be aware of how you are directing it.

I let this dry for a full 24 hours before attempting to hang them up. And again, I did not seal these. If you wanted a different finish(glossy/high shine) Im sure you could hit them with a coat of spray on.

Modern Painted Antlers

Now lets talk hanging hardware. I’ve never been shy about decorating our walls whether we were renting or owned. And over the years I’ve tested a number of different hardware. I know that’s probably making some of you cringe because you’re team “don’t destroy the drywall”! But! I think I’ve found a pretty good compromise.

I picked up this multi-pack of hangers from High & Mighty a while ago and I’m thoroughly impressed! (No, I’m not affiliated with H&M) They can hold an insane amount of weight for their size and they only make a hole the size a thumbtack would leave. Thats tiny! And, even better, they’re a tool free product. #winning

Modern Painted Antlers

I am loving this makeover and I cant wait hear what a few of my “traditional hunters” think! So would you paint a set of antlers? Have you already given a taxidermy piece a mod makeover? You know I’d love to hear all about it in the comments!

Continue Reading

Home Tour: Bath

This post includes affiliate links. For the full disclosure policy click here.

Its been over a year since Q and I celebrated our 10th anniversary in the Dominican Republic. That said, not a day goes by I don’t think of at least some part of that trip. It was just one of those amazing once in a lifetime experiences. Part of the magic there was the morning we spent at the spa. The building, decor, and general vibe was amazing and incredibly calming. So its no surprise its been one of my biggest inspirations while decorating the loft bath!

When I started collecting items to pull together this look I wanted to focus on a couple specific elements and feelings. Yes, I said feelings. You know that sense of calm that washes over you when you step into a spa. Its the one that says “its time to relax”, “you deserve a touch of luxury”, and “this is a peaceful space” all in one…. ya, you know what Im talking about! I also wanted to pull tropical elements without crossing the line into “beachy”. Not that beach is a terrible theme but I had a grandma with a beach bathroom complete with those seashell soaps no body was allowed to use. You know the kind! Nothing about that side of beach decor says resort spa to me(sorry grandma!).

Home Tour: Bath

One of the elements I saw repeated throughout the spa that I just couldn’t get enough of: oversized foliage. They used leaves to line tall lanterns, under piles of crisp white towels, and as coasters for your cucumber water. Obviously I don’t have an endless supply of fresh banana leaves here in San Jose so I turned to faux stems. Luckily there are so many awesome products out there for “life like” foliage! I picked up this oversized Split Leaf Philodendron at Michaels but Palms or a Monstera would be lovely as well.

Home Tour: Bath

With the cabinets, tiles, and sink already fulfilling the crisp white quota for that spa feel I only needed to add a few touches of color. I pulled the blues and neutrals from the prints below which were hand-me-downs I’ve had for years. The color pallet in these prints could not have been more perfect for this resort spa vibe! I just picked up a set of distressed frames and used them sans glass.

Home Tour: Bath

Another element I saw repeated heavily was natural textures. They had giant stone planters, raw wood shelving, teak shower decks and several other fabulous natural materials throughout the spa. I rummaged through the items I had on hand  and found a fairly good mix! You’ve got to love shopping your own stash! #winning

Home Tour: BathHome Tour: BathHome Tour: Bath

After the straw/palm, rope, and leather pieces were added to the mix I was picking up momentum on the project. But there was stiiiiiiill just something missing… I couldnt put my finger on it. Until I saw the teak tissue cover! Ha! It seems like a silly little thing but I knew it was the last natural “element” I was missing in my mix. I ordered the matching tub caddy the same day and I’ve been obsessed since. No spa is complete without legit aqua-therapy!

The last couple items are classics: salts and candles. We are all about that detox salt soak and I buy the salt in bulk. Having a pretty jar means I can store them out on the countertop which is great when you are short on vanity storage space. The candles are a mix of scents and sizes I pick up whenever I find something I like. Im pretty picky about scents but a little aromatherapy can totally change a space. Plus, a softer light (like a few well placed candles) can really set a sense of calm.

So are you feeling that resort spa calmness yet? I know I am! Have you used any of these elements to create your own spa vibe? Have any other spa tips to share? You know I’d love to hear all about it in the comments!

Home Tour: Bath
Creating a spa atmosphere at home can be a fabulous way to relax. We took inspiration from our last tropical resort trip to DIY an at home spa. Check out the details!

</div

Continue Reading

Home Tour: Front Door

This post includes affiliate links. For the full disclosure policy click here.

Our loft has rows and rows of the same door/light/number entries and while they’re clean and fairly new they’re also fairly boring! I know we aren’t the only renters with this dilemma. When you live in an apartment your entryway is most likely going to look like eeeeeevery body else’s. But that doesn’t mean it needs to stay that way! You can absolutely personalize your front door and entryway to make your rental space unique.

Home Tour: Front doorDoormats:

This is probably one of the first things we add to any new space. Its functional since it cuts down on the dirt tracked into our place as well as decorative. If you’re feeling crafty your can DIY a design on a solid mat. Or you can shop any of the billion designs online(seriously theres bound to be a design perfect for your space!). We grabbed this one at Target.  Home Tour: Front DoorPlants:

Its no secret I hope to become a #plantlady and let our space be taken over by fabulous green lovelies. And our entry way is no exception! I knew I wanted something green to liven up the space but sunlight was an issue. We basically enter by hallway(even though its outdoors) which means there is very little sun. This limited our choices a bit and I’m pretty positive you wont find bright flowers gracing our front door but I’m ok with that. Luckily succulents and other non-fussy plants are popular and finding something for this nook was easy. I rarely have to water this Dragon Tree and its thriving even without great sun exposure.  Home Tour: Front DoorWreaths:

With the help of removable hooks even us renters can add wreaths to our front doors! You can find them in nearly any color so they are no longer just for the holidays. Yay! I loved this mushroom wreath the second I saw it and I know I can add decorative bits to dress it up throughout the year. Its made of dried and dyed mushrooms and it adds a ton of texture. If our front door got a lot of exposure to the elements I’d look for something less fragile. In this case, Im using that hallway to our advantage. Home Tour: Front DoorIts only a couple simple items but it changes the look of our entryway and livens up our space. So what are your favorite ways to decorate the front door and entryway? You know Id love to hear all about it in the comments!


Home Tour: Front Door
Continue Reading

Bike Storage Part 2

This post includes affiliate links. For the full disclosure policy click here.

Bikes. We obviously love them and not long ago I posted about our first bike storage solution. The bike pulley has been one of our favorite finds and it has served us well so far. That said, we were ready to find another way to store the second bike in our loft. We wanted to check out other options so our stairway/ceiling space didn’t get too cluttered. Which is when we found these bike hangers. They can be hung from the ceiling or a wall which meant they provided LOTS of options!

Bike Storage

When we first moved into the loft we didn’t think much about the opening in the down stairs room. I just assumed we would design around it and leave it as is. I should have known better! After trying a few different floor plans for both rooms(either side of this wall and opening) I was really wishing the thing was just solid. So we closed it off with curtains and set up the living room accordingly.

Bike Storage

The space stayed this way for quite some time and my bike lived on the other side. It was generally propped up against the wall and while it wasn’t in the way it still visually cluttered the space. One day while propping my bike up after a ride I realized the bike was about the same size as the opening itself. Lightbulb moment! I lifted the bike up and sure enough it totally fit in the opening. The wall here is thicker than normal so the width of the handlebars also wasn’t going to be an issue.

Bike Storage

After I bought two hangers we installed them using drywall anchors. We spent some time living with a “framed” bike I realized I wanted the option to close the space completely. Back to Amazon to order some basic curtain panels for the office side of this wall! After hanging a new rod and both panels the bike storage part 2 was complete!

Bike Storage

The panels look a bit translucent in the photo but its just the sun/lighting. They are completely opaque and when they are closed you cant tell there is anything behind them. Its insanely easy to hang my bike up and throw the curtains closed after a ride. And nobody would ever guess there is a bike or opening behind these panels!

I realize not everyone has an opening specifically like this but its not the point. The point is to look for unexpected spaces to use for storage! Im sure most people don’t evaluate hallways, banisters, windows, openings, soffits, etc for their storage potential. But if you look past the “assumed” function you may just find a little hidden storage potential.

So what spaces have you converted into storage? Have any other fabulous bike storage tips to share? I’d love to hear all about it in the comments!

Bike Storage
Continue Reading

Storage Solutions: Underbed Real Estate

This post includes affiliate links. For the full disclosure policy click here.

Underbed Storage

If you follow me on instagram you’ve seen #loftlife plenty. I love it. Really its been a challenge in the best way to adapt to loft living. One of the challenges we’ve come across is how to live(realistically) in an appealing space when everything is so open. It takes very little to clutter up this loft so finding hidden spaces to use for storage has been crucial. Obviously those “hidden” spaces are scarce in the loft. But everyone has at least one great hidden space for storage: underbed real estate!

The number of underbed storage boxes and bins available is nuts! You can find them in nearly every color, size, and shape so if you have ANY space under your bed you can take advantage. We have a fairly low bed so it took a bit of extra online searching to find a set that would really utilize the whole space. I came across these and decided to give them a try. I could fit 6 total under our king size bed and they were totally affordable.

Underbed Storage Solution

After living in our loft for a few weeks we had weeded out the items we wanted to keep with us but didn’t use very often. Some of the items that made it into the bags were spare linens, seasonal clothes, and bulky beach towels. With 6 full bags these are totally life savers for our closets and cutting clutter. This is basically the equivalent of half a closet people!

Underbed Storage Solution

After living with the bags for a while I was completely happy with their usefulness. Their visual clutter…. not so much. We don’t have a comforter that reaches to ground so being able to see them under the bed was obnoxious. Enter my search for a bed skirt that didn’t remind me of something from a victorian home. Also, am I the only one that thinks of Bunny and the dust ruffle argument when bed skirts are brought up? Didn’t think so!

Underbed Storage Solution

Again, our bed being lower than average meant finding a suitable product took a little extra searching. If you have a standard height bed you can use one straight out of the package. Unfortunately this was not the case for us. They simply do not make bedskirts the right size for our height. So I ordered the closest size, trimmed, and hemmed it to fit. Hemming is one of the simplest sewing skills but easily one of the most useful for DIY projects. If you haven’t mastered this I promise its worth looking up a tutorial and/or practicing. It will open up the products you can use for projects significantly.

Underbed Storage Solution

With the 6 underbed bags and and 1 custom fit bedskirt we have completely upped our storage! The fact that you cant even tell we are using the space for storage is a total bonus as well!

Underbed Storage Solution

So what spaces have you used for secret storage? Have you converted your underbed real estate into useful space? Tell me all about it in the comments!

Underbed Storage Solution
Continue Reading

Throw Blanket Pillow Cases

This post includes affiliate links. For the full disclosure policy click here.

Throw pillows. Can you ever have enough? I think not! We have quite the collection throughout our home but the pile that lives on our couch really needed updating. Speaking of updating, the colors in our living room are all new for the loft which is so overdue. Ive been holding onto this color inspo board for sooooo so long and its finally getting used(YAY!). Only problem with that is finding pre-fab decor items in such punchy colors. So I’ve had to get extra creative and the throw blanket pillow cases were the perfect start!

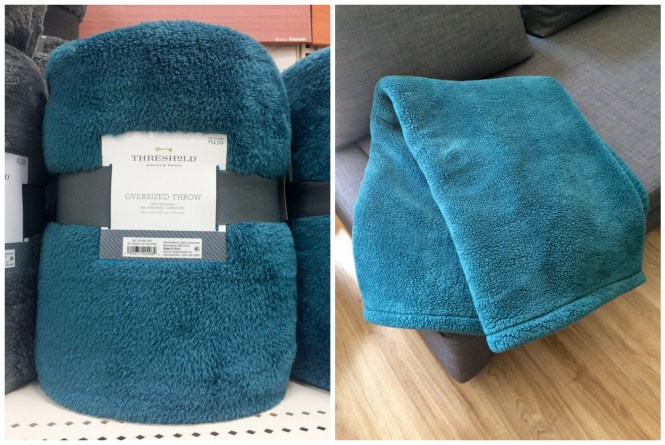
As I said, the colors I picked(and LOVE!) are not ones I’ve been able to find right on the shelf in the items I need to replace. So when I found this cozy throw blanket at Target I snatched it up real quick. At first I thought I would just use it as a throw for couch snuggling and we did use it for a short time. But after trying and failing to find pillow cases in the right color I realized the throw was basically just a piece of fabric in the ideal shade.

Throw blanket pillow cases

After skimming a few tutorials on Pinterest I realized I could make these super basic and skip the time consuming details like zippers(double yay!). I love sewing. Really, I do. I’ve been doing it since I was a kid(thanks Mom!) and I’ve sewed everything from simple blankies to very detailed garments like my wedding dress. And as much as I appreciate intricate stitched items nothing beats the high of completing a project in 20 minutes! Yeah, you read that right! 20 minutes my peeps!

Throw blanket pillow cases

The very basics of my envelope pillow case: Trim off original rolled hem. Roughly measure enough fabric to cover pillows with 4″ overlap. Hem flap edges. Fold with right sides together so the hemmed edges overlap 4″. Stitch down both lengths. Turn right side out. Soooooo basic!

Throw blanket pillow cases

If you want to get really precise or if you are using a less forgiving fabric by all means to the math. Map out your cuts, iron your seams, and pin EVERYthing. I’m sure my old sewing teacher would recommend doing every single one of those steps! But! Being this fabric is a fleece with a stretch and it was going on slouchy pillows I skipped those deets and it all came out perfect. At least to my eye!

Throw blanket pillow casesThrow blanket pillow cases

One thing I will recommend is a walking foot. My machine is older and I’m sure its not the most fancy attachment but it makes a difference. When I hemmed the flaps(literally eyeballed it and folded over as I went) I used the regular foot. But once I folded the fabric over itself and started sewing it shut I was going over 3 thick layers of fleece. The walking foot kept everything moving smoothly and I promise its worth switching out!

Throw blanket pillow casesAlso, if you wanted to add a closure but still don’t want to deal with the hassle of a zipper a button would be perfect. Especially if it was something chunky, decorative, toggled, etc. Like I mentioned before, these pillows are super slouchy(which is why they’re so cozy!) so for now the envelope style sans closure is awesome. If I stumble upon a great decorative element later on I could still hand stitch it on. But for now these pillow cases are giving new life to our couch scene!

Throw blanket pillow cases

So have you repurposed any fabric lately? Cut up blankets for any other DIYs? You know I’d love to hear all about it in the comments!

Continue Reading

Lazy Gallery Wall

This post includes affiliate links. For the full disclosure policy click here.

Gallery walls are classic and I’ve used them somewhere in nearly every place we’ve lived! But all the measuring and math involved in the traditional way of hanging them is more work than I’m ever willing to do. Ever. Even the day I hung my thesis for our Senior Show I brought my paint stick(half this hack!) and finished hanging in minutes. And guess what? Not a single professor or photographer suggested any adjustments! So be lazy. Im giving permission. Ha! Or just consider yourself a bit more efficient because this guide to a lazy gallery wall will help get your art up in no time!

Lazy gallery wall

The wall beside our bed is totally basic but the space is open and perfect for something a bit oversized. After going through the stacks of canvases and framed photos we have left to hang I decided on a set I took in school. The photos are pieces of Q in his uniform a few years ago and they are still some of my absolute favorites. Plus, all the navy works perfect with our new palette! #winning

Ok, so the only measuring this requires is setting the mid-point. Which, I know(thank you art school) always gets placed at 58″ from the floor. I couldn’t tell you the science of why this is so esthetically pleasing but it works so I don’t mess with this measurement. This means the middle of your collection as a whole is placed at the 58″.

Lazy Gallery Walls

Once you find that midpoint(58″) slap a piece of painters tape up long enough to line your grouping. Use a tape the same width you want between your images since this is essentially your hanging guide. Add a piece that intersects your first guide at the horizontal midpoint(creating a T). Using a laser level to make sure these two pieces are well set and level. A little attention to detail on the first two will ensure the rest of the group is lined up well.

Lazy gallery wall

Use the old paint stick trick to hang your first frame. Start with the ones you want in the middle as you will be working your way out. This method of hanging makes it super easy to line up the edges of your frames with the tape guides. Once the first frame is set add your next piece of painters tape to the opposite side of the image(pictured). Again, these are your spacers! Continue working your way out and up. I promise your wall will come together in minutes. Really, minutes!

Lazy gallery wall

Before you pull the tape off your finished wall use a small amount of Blu-Tack to keep everything in place. Blu-Tack is a repositionable adhesive that will keep your frames perfectly lined up without leaving any residue on your paint or holes in your drywall. This really keeps your frames tightly lined up and it only takes a few seconds to place a dab behind each frame.

Lazy gallery wall

When everything is set simply peel off that painters tape(so gratifying!) and enjoy your perfectly placed gallery wall!

Lazy gallery wall

Lazy gallery wall

So have you installed a gallery wall lately? Used any tricks for hanging quickly? Tell me all about it in the comments!

Continue Reading

Painted Fabric Chair

This post includes affiliate links. For the full disclosure policy click here.

The Original Chair

We bought this chair from a Habitat For Humanity ReStore for dirt cheap. It was a total goldilocks scenario since the chairs that are most comfortable for me are rarely comfy for Q. But, by some miracle, this one fit us both! Only problem was the color. It was a really unattractive mauve with green dots and that just wasn’t going to work with everything else in our place. We bought the chair thinking we were going to reupholster it but quickly decided that was entirely way too much work. After a bit of research I planned on painting it… and then a whole year and a 3,000 mile move happened. Ha! Since I was getting down to business with the decor in the loft it was time to finally tackle the ugly pink chair. Luckily this painted fabric chair turned out better than even I expected.

Painted Fabric Chair

The Solution

See, if you search painted fabric chair(or furniture) you will get a ton of results and nearly all of them are done just a bit differently. Being that I’ve never painted any fabric furniture I just wanted to make sure two things happened. First, I wanted the fabric to stay soft and pliable. I mean whats the point of a comfy upholstered wingback chair makeover if it ends up a stiff mess? No point! Second, I wanted full coverage on that awful pink color! Side note: if this color is your jam and you make it work in your house more power to ya! But this is just simply not the case in the loft.

The Steps

After pulling from a handful of tutorials I did the following to get some pretty fab results:

-Vacuum the chair thoroughly(esp. all those nooks and crannies!).

-Mix 1 part fabric medium with 2 parts interior paint.

-Spray the area you are painting with a light mist of water.

-Use a stiff brush to paint light coats over the entire chair. A smaller bristle brush is also helpful to get into all the creases and corners.

-Sand the surface in between coats(once completely dry) with fine grit sandpaper.

Painted Fabric Chair

[After the first coat. Yes, it looks patchy and scary but just keep painting!]

Now comes the fun part! If your chair has a distinct texture like ours you can layer your paint to keep the textured design. This idea came to me after sanding the first layer. Because the sanding is what keeps the chair from getting stiff you always end the layer with sanding. This will expose a layer below the current top layer of paint and in doing so you will also accentuate any raised pattern or texture in the fabric.


Painted Fabric Chair

I started with a couple coats of classic silver and hand tinted the paint for the remaining layers. I went darker by adding a couple ounces of black paint which I measured out on a scale (so I could replicate it if need be). Once the final coat dried and I sanded it down the texture really popped. And still no sign of the ugly pink!

The Results

Painted Fabric Chair

[before & after sanding]

Painted Fabric Chair

This does add a more rustic or even shabby chic feel(which isn’t typically us) but in this space its going to fit right in! All the wood in our bedroom is raw or unfinished so another perfectly imperfect piece is totally making us happy!

Painted Fabric Chair

So have you painted a fabric chair? Or any other fabric furniture? You know I’d love to hear all about it in the comments!

Continue Reading